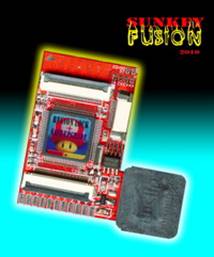
D2Sun Team presents you SunKey Fusion
A fusion of 3 fantastic D2Sun products:
Wii-Clip + D2Sun + Sunkey all-in-one
SunKey Fusion User Manual
Version 1.0
Contributed by info@d2sun.nl

Changelog:
Manual:
Ø Initial release.
Table of contents
2. Installation
of the SunKey Fusion : SunKey Mode
2.1 Connect the ribbons and external
switchboard
2.2 Connect the Wii DVD drive.
3. Installation
of the SunKey Fusion : D2Sun Mode
3.1 Configure the Wii Region
(PAL/USA/JAP/KOR)
3.2 Configure the Wii chipset
(DMS/D2A/D2B/D2C/D2C2/D2E)
3.3 Configure the J1 jumper to work
d2sun mode without switchboard.
4. Installation
of the SunKey Fusion : Fusion Mode
4.1 Configure the chipset and region
settings for 6x speed switch mode
4.2 Install the wires between the dvd
drive and the SunKey Fusion
4.3 Connect the FPC's to the SunKey
Fusion
4.5 External Switch board, select D2Sun
or SunKey mode
5. Firmware
update with the Nero Dual Programmer.
1. The SunKey Fusion Package
1.1 Contents of package
In the package you should find the following items:
ü
SunKey
Fusion
ü
Control
switch board
ü
FPC
ribbon to connect to the switchboard and if need for update to the nero
programmer
ü
FPC
ribbon to connect SunKey Fusion on Wii DVD
ü
1
sticker to secure your SunKey Fusion on the Wii chassis
1.2 The SunKey Fusion Specs
·
Plug and play,solderless with the SunKey mode, and partial solderless
with D2Sun mode
·
SunKey mode come with A.I. Boot to auto choose region, support
JAP/USA/KOR/EUR all regions perfectly,100%
smart and play & play!
·
Support D5/D9 games
·
Support homebrew roms
·
Support GC games
·
Support USB update CPLD core and EEPROM firmware via Nero Dual
Programmer, never outdate
·
Offer 3 working mode: SunKey / D2Sun / Combo
·
Comes with external switch configure board, can swap the 3in1 chip
working at SunKey 3X mode or D2Sun
6X mode in real time
·
Comes with original Wii-Clip, solderless for all old model Wii driver,
just plug and play
·
D2Sun mode come with the last 6 wires firmware
·
Support the last BCA Protection
·
Supports all chipsets DMS,D2A,D2B,D2C,D2C2 and D2E, 100% ALL-IN-1
solution
·
Supports D2-v1 chipset in SunKey
mode
·
Supports the pins-cut D2B Wii without grinding the chip, just place the
clip on chip like other versions.
·
Compatible with DVD+/-R, DVD+/-RW and Dual-layer 8.5G DVD (movies and
GCOS)
·
Comes with 2~8Mbit on board SPI flash
·
Comes with 24M on board CLK, 100% work stable on all Wiis, without any
CLK problem
·
Direct boot of Wii original and backup games from the same region
·
Direct boot of Gamecube original and backup games from the same region
·
Direct boot of different NTSC region Wii and GC games on USA and JAP
consoles
·
Partial region free support on Wii and GC original and backup games with
different video mode (ie PAL<->USA,
JAPAN,KOR)
·
Comes with Region Lock and Safe Upgrade function, can let you run the
game and upgrade the game 100%
safely, no way to brick your wii in any situation
·
Improved read settings for recordable media
·
Supports running GC games at Wii disk speed
·
GC Audio streaming Fix (D2Sun mode)
·
Supports full-size DVD and DVD9 discs for GC homebrew
·
Supports Wii and GC multidisc games (D2Sun mode)
·
Does not modify RAM, making it virtually undetectable for the Wii
·
Compact design, best quality components, rock solid high speed
controller
·
Two LEDs indicate the D2SUN working status
·
High speed and high secure Actel FPGA
·
Professional ESD packing
2.
Installation
of the SunKey Fusion : SunKey Mode
Installation of the Fusion's SunKey Mode is very easy and 100% Plug
& Play.
There are no adjustments or settings needed to pre-configure the chip.
SunKey mode runs with A.I. Boot so it will auto set the correct region.
If you do not want to connect the switchboard you can leave it off in
this mode.
For future updates it is recommended to at least connect the FPC in
order to be able to connect the Nero Dual Programmer and apply the firmware
update without opening your Wii first.
SunKey mode supports DMS/D2A/D2B/D2C/D2C2/D2E/D2-v1 chipsets at 3x
speed.
2.1 Connect the ribbons and external switchboard
Connect the 3 FPC's and the external switchboard as shown on the
picture.
Make sure the FPC's are connected correctly.
2.2 Connect the Wii DVD drive.
Now connect the FPC to the Wii DVD drive connector as shown on the
picture.
Use the provided sticker to securely mount the chip on the Wii chassis.
2.3
Reassemble
your Wii
Now you can continue with re-assembling your Wii and enjoy your freshly
installed SunKey Fusion.
You can use the GC memory slot or the usb port to lead the FPC outside
of the Wii.
Now start enjoying your freshly installed SunKey
Fusion!
3. Installation of the SunKey Fusion :
D2Sun Mode
Installation of the Fusion's D2Sun Mode is very easy and partial Plug
& Play.
SunKey mode supports DMS/D2A/D2B/D2C/D2C2/D2E chipsets at 6x speed.
First thing to do is configure the chip to set the correct region and
chipset of the Wii.
If you do not want to connect the switchboard you have to configure J2
to set d2sun mode 6 x speed. See section 3.3 - configure the J1 jumper to work
in d2sun mode.
For future updates it is recommended to at least connect the FPC in
order to be able to connect the Nero Dual Programmer and apply the firmware
update without opening your Wii first.
3.1
Configure
the Wii Region (PAL/USA/JAP/KOR)
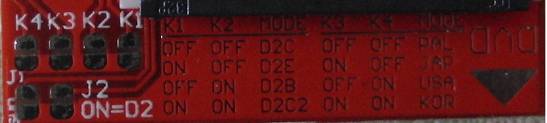
Configuring the Wii's region is done by setting the K3 & K4
according the following scheme.
By default, K3 & K4 are OFF, reflecting the PAL region.
Set the region to USA by connecting K4 as shown in the picture.
Set the region to JAP by connecting K3 as shown in the picture.
Set the region to KOR by connecting both K3 & K4 as shown in the
picture.
Now go the the next step to configure the Wii's chipset of the DVD
drive.
3.2
Configure
the Wii chipset (DMS/D2A/D2B/D2C/D2C2/D2E)
Configuring the Wii's chipset is done by setting the K1, K2 and J1
according the following scheme.
By default the chip is set for D2C chipset, K1 & K2 = OFF, as shown
on the picture.
To set the chipset to DMS or D2A, connect J1 as shown on the picture.
Set the chipset to D2B, connect K2 as shown on the picture.
Set the chipset to D2C2, connect K1 & K2 as shown on the picture.
Set the chipset to D2E, connect K1 as shown on the picture.
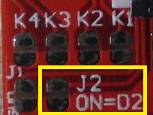
3.3
Configure
the J1 jumper to work d2sun mode without switchboard.
If you do not want to connect the external switch board in d2sun mode
you need to set the J2.
If you do not set the J2 then you need to set the switchboard on 6x in
order to use the d2sun mode.
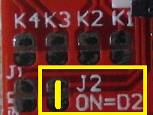
J2 is not set, external switch board is needed to set d2sun 6x mode.
J2 is set, no need to install the switchboard,d2sun 6x mode selected.
Next you can use for a Wii-Clip (see 3.4) or a Wired (see 3.5)
installation.
3.4 Wii-Clip installation
After setting up the correct region of chipset the easiest method of
install is done by using the build in genuine Wii-Clip.
Before you clip it, first connect the FPC with switchboard if you didn't
set the J2 config option (see 3.3) and make sure it is set to 6x.
If you did set the J2 config option, then we recommend you still connect
the FPC in order to allow to connect the Nero Dual Programmer for future
firmware updates.
Now simple clip it on the chip of the DVD drive and you are ready to
play.
3.5 Wired installation
If you do not want to use the build-in Wii-Clip it is off course
possible to just traditionally wire-up the chip to the DVD drive of the Wii.
If you didn't set the J1 config option (see 3.3) you need to connect the
FPC and the external switchboard to the chip, set the switch on the board to 6x
for d2sun mode.
If you did set the J2 config option, then we recommend you only connect
the FPC in order to allow to connect the Nero Dual Programmer for future
firmware updates.
Simple follow the installation scheme as show in the picture.
5 wires for DMS, D2A and D2B chipsets: GND, 3V3, A, B, Q.
6 wires for D2C, D2C2 and D2E chipsets: GND, 3V3, A, B, Q, K.
3.6
Reassemble
your Wii
Now you can continue with re-assembling your Wii and enjoy your freshly
installed SunKey Fusion.
You can use the GC memory slot or the usb port to lead the FPC outside
of the Wii.
Now start enjoying your freshly installed SunKey
Fusion!
4. Installation of the SunKey Fusion :
Fusion Mode
The SunKey Fusion mode is a combo installation method which enables you
to switch between the traditional wired and the newer type SunKey PFC/flat
cable installation mode.
2 Different technologies in 1 installation, real-time switchable by
using the external switchboard. Suitable for DMS/D2A/D2B/D2C/D2C2/D2E chipsets.
4.1 Configure the chipset and region
settings for 6x speed switch mode
Follow the steps as describe in chapter 3.1 and 3.2 in
order to set the d2sun mode's region and chipset configuration.
After those steps continue with chapter 4.2 to install
your SunKey in Fusion Mode.
4.2 Install the wires between the dvd
drive and the SunKey Fusion
Connect the wires between the DVD Drive and the chip according the
reflected scheme (see 3.5). Do NOT connect ground and power since we are doing
a fusion mode install.
Connect A, B and Q for DMS/D2A/D2B chipsets.
Connect A, B,Q and K for D2C/ D2C2/D2E chipsets.
4.3 Connect the FPC's to the SunKey
Fusion
Connect the 3 FPC's and the external switchboard as shown on the
picture.
Make sure the FPC's are connected correctly.
Now use the provided sticker to mount the chip on the chassis of the
Wii.
4.4
Reassemble
your Wii
Now you can continue with re-assembling your Wii and enjoy your freshly
installed SunKey Fusion. You can use the
GC memory slot or the usb port to lead the FPC outside of the Wii.
4.5 External Switch board, select D2Sun
or SunKey mode
The external switchboard allows you to switch between
the D2Sun or SunKey mode. D2Sun mode runs at 6x speed, SunKey mode runs at 3x
speed.
Default the switchboard is set to 6x d2sun mode.
Now start enjoying your freshly installed SunKey
Fusion!
5. Firmware update with the Nero Dual
Programmer.
As usual this product is again future proof.
Simple disconnect the external switchboard and connect the FPC to the
Nero Dual Programmer in order to apply an new firmware update for your SunKey.