D2Sun Team presents you SunDriver
Connect your CF/ATA/SATA device up to 2TB
SunDriver Quick-Start User Manual
Version 0.1
Contributed by info@modpro.nl
Changelog:
Ø Initial release.
Table of contents
3.1 Install firmware update ribbon and
storage media to the SunDriver.
3.2 Install SunDriver to the Wii
3.3 Download the SunDriver Programmer PC
Tool
3.4 Initialize your SunDriver storage
media.
3.5 Download and install the SunDriver
Menu for game selection.
3.6 Set SunDriver configuration options
3.7 Start the SunDriver Game Selection
Menu
3.8 Install games to the SunDriver
3.9 Operating the SunDriver Game
Selection Menu
4. Updating
the SunDriver firmware
4.1 Check for the latest SunDriver
firmware
4.2 Connecting SunDriver to the Nero
Programmer
4.3 Connecting Nero Programmer to PC
4.4 Updating the SunDriver firmware
1.
Read first!!
Warning!!!
You most only use a original Wii power-supply
in order to connect the SunDriver to your Wii.
Third-Party power-supply does not provide
enough and stable power circuit if you are using the SunDriver.
2. Quick Start
For a quick start with your SunDriver checkout this install vid made by GMODZ:
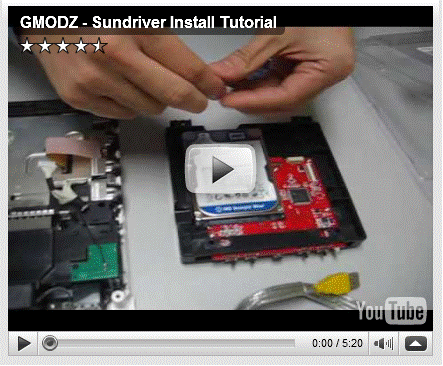
http://www.youtube.com/watch?v=ZmXKluEPasg
This vid will show you how to:
ü install harddisk to SunDriver
ü install SunDriver firmware update cable
ü install the SunDriver into the Wii
ü connect SunDriver to PC via USB
ü load game.iso with SunDriver Programmer tool
ü install the SunDriver-Menu with SunDriver Programmer
tool
ü start the SunDriver-menu to select game for loading
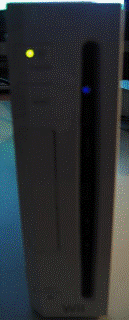
When connecting the SunDriver
to the pc, make sure you power on the Wii.
Vista/Win7 users, set the windows
compatibility mode on the programmer pc tool to run as Windows XP (Service Pack
3).
In order to use the SunDriver
Game Selection Menu, make sure the jumpers are set correctly; switch them
all away from the led.
If you loaded the menu with the
programmer tool correctly the SunDriver menu will be mounted in the disc
channel after you power on the Wii. Start the disc channel to load the
SunDriver Game Selection Menu.
Use a gamecube controller to
navigate the SunDriver Menu or simply use the Wii's RESET and EJECT button to
do so. Reset to navigate, eject to select the game. After you select the game
the Wii will reboot and your game will be mounted in the Wii's disc channel.
3. Getting Started
Installation of the SunDriver is very easy, in this chapter we briefly
cover the step of installation. If you run into issues, just find us at our forum@wiinews.
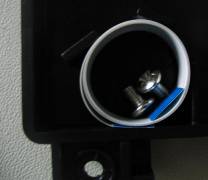
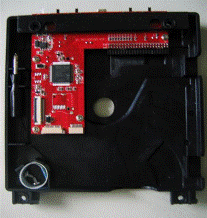
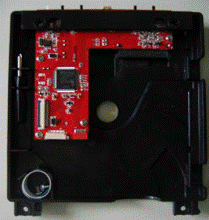
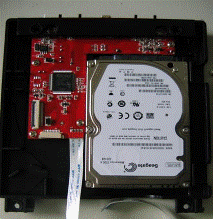
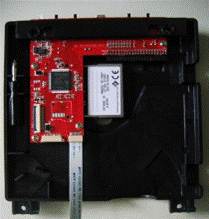
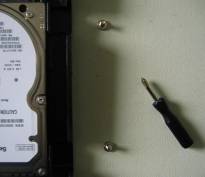
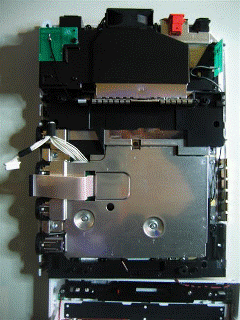
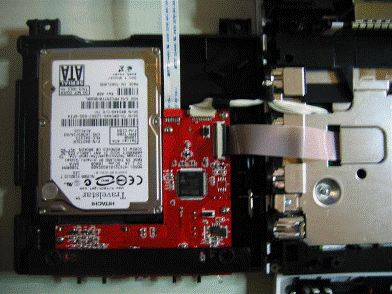
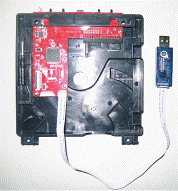
3.1
Install firmware update ribbon and storage media to
the SunDriver.
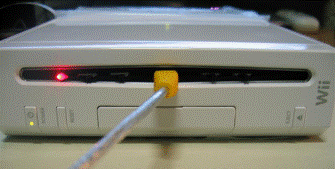
Connect the firmware update ribbon to the socket on the SunDriver pcb in
order to be able to update the SunDriver firmware without re-opening the Wii
console. Next, connect your CF, ATA or SATA storage device to the SunDriver.

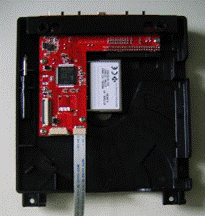
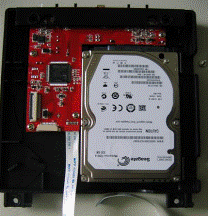
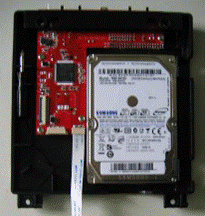
Use the supplied screws and tool to mount the Disk to the SunDriver.
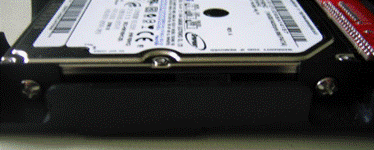
3.2
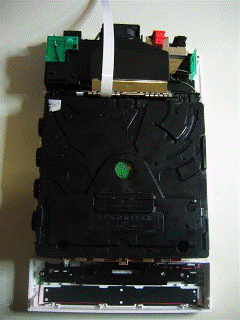
Install SunDriver to the Wii
Open your Wii
console and disconnect the Wii DVD drive.
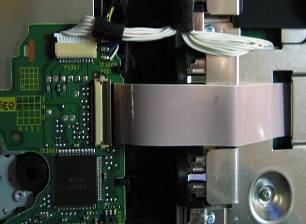
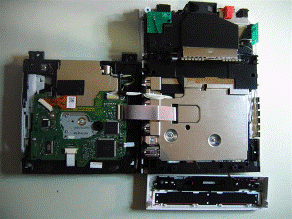
Next, connect the SunDriver as you where connecting the Wii DVD drive to
the Wii. As simple as that.
Now it's time to close your Wii again.
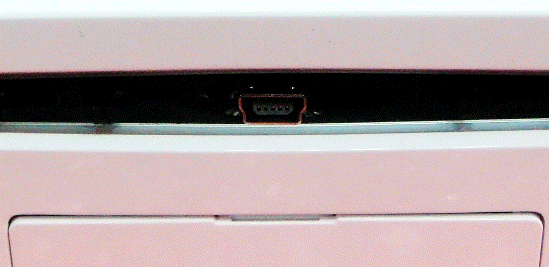
If you have any difficulties to nicely fit the usb in the front panel
then use this method:
Insert one paper to the slot of wii front case.
Assemble the wii front case , let the sundriver upon the paper, and paper
upon the black flannel.
After assemble complete, remove the paper, then you will see the USB port have
appear perfectly.
3.3
Download the SunDriver Programmer PC Tool
The SunDriver Programmer is designed to manage your SunDriver by using
your PC.
With this tool you can adjust ALL
configuration settings of your SunDriver.
Beside the management of the SunDriver configuration the SunDriver
Programmer is also used to copy your games with high speed usb2.0 from the
SunDriver to your PC and around.
Download the latest version of the SunDriver Programmer tool at the
download section of the D2Sun’s website (http://www.d2sun.com/download.htm).
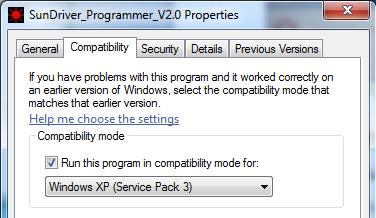
A note for vista and Windows7 users;
In order to use the programmer PC tool on Vista or Windows7 you need to
set the compatibility via properties of the programmer file to “Windows XP
(Services Pack 3)”.
There is no need to
install the program or anything else on your PC, you can use this tool by
simple execute it (click on it).
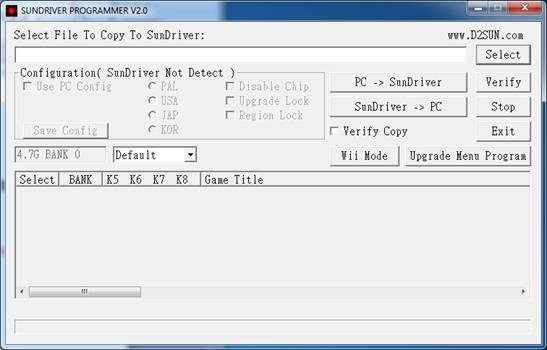
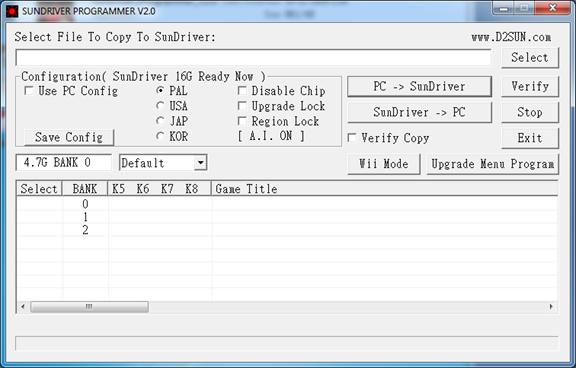
When started without the SunDriver connected the tool will indicate
‘SunDriver Not Detect’.
![]()
Now it's time to connect the SunDriver to the pc by using the usb2.0
port of the SunDriver.
Connect the Wii like usual and connect the usb cable between the
SunDriver's usb port and your pc. Don't forget to power on the Wii.
Now the SunDriver Programmer tool should detect the SunDriver and the
status will change to ‘SunDriver Ready
Now’, SunDriver led will be red.
![]()
3.4
Initialize your SunDriver storage media.
Since this the first time you're going to use the storage media in the
SunDriver, you need to initialize it before the SunDriver can use it correctly.
In order to do so we now need to click the button 'Wii Mode'.
![]()
After you click the 'Wii Mode' button the Programmer tool will pop up to
ask you if you are sure.
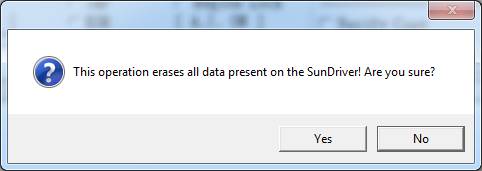
(It will ask you this twice.)
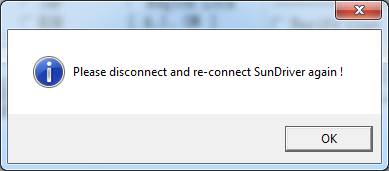
When the process is done the SunDriver Programmer tool will ask you to
disconnect and re-connect the SunDriver again to the PC.
If you do not initialize the storage media and if you
used it before on for example you pc, any operation (install game, install
menu) will result in the following error.
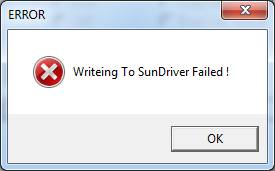
So if you got this error, (re) start the initialize storage media
procedure.
3.5
Download and install the SunDriver Menu for game
selection.
D2Sun team created a nice gamecube application for game selection for
the SunDriver.

In order to use this game selection menu you have to download and
install it on the SunDriver.
Download the latest version of the SunDriver-Menu at the download
section of the D2Sun’s website (http://www.d2sun.com/download.htm).
Now select the Upgrade Menu Program button in the programmer pc tool.
![]()
After a few seconds a window will open to select the SunDriverMenu*.iso
file you just downloaded from the d2sun's website.
Select the Menu iso file and click Open.
After a few seconds the programmer tool starts to install the SunDriver
Menu.
![]()
After some 1 minute the SunDriver Menu is installed on your SunDriver.
In order to use the SunDriver Game Selection Menu, make sure that the 4
jumpers of the SunDriver are in the correct position: switch them all away from the led.
3.6
Set SunDriver configuration options
With the SunDriver Programmer pc tool you can set the SunDriver
configuration options. In fact there are 3 ways to operate your SunDriver;
Ø SunDriver Game Selection Menu
Ø SunDriver jumper settings
Ø SunDriver Programmer pc tool
We will keep it for now so we can use the SunDriver Menu for game
selection and activate the update blocker to prevent any system updates from
the games.
In order to
use the gamecube SunDriver Menu make sure that the option 'Use PC Config' is
UN-checked.
![]()
In order to activate the update blocker make sure to
select the option 'Upgrade Lock'.
![]()
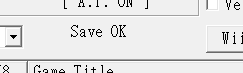
Now hit 'Save Config'.
![]()
After a few seconds the Programmer should give you a
'Save OK'
3.7
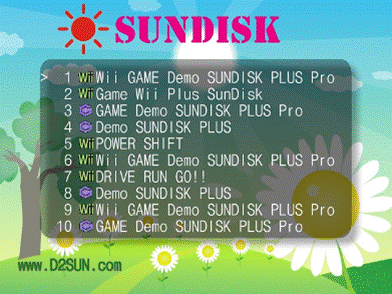
Start the SunDriver Game Selection Menu
Now it's time to see if the initial setup of the
SunDriver is successful, disconnect the usb to pc connection and wait until the
SunDriver Menu is probed in the disc channel of the Wii.
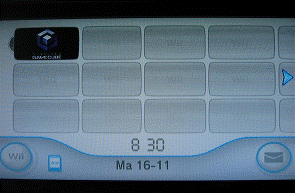

If you can see this menu then
the upload of the SunDriver Menu was successful.
3.8
Install games to the SunDriver
Now we are ready to install
games to the SunDriver. Connect the SunDriver usb to the pc, you will see the
USB LINKING message on the SunDriver Menu.
Now start your SunDriver
Programmer tool on your pc.
 \
\
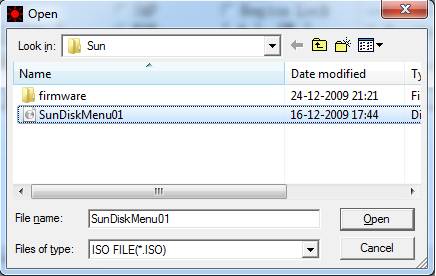
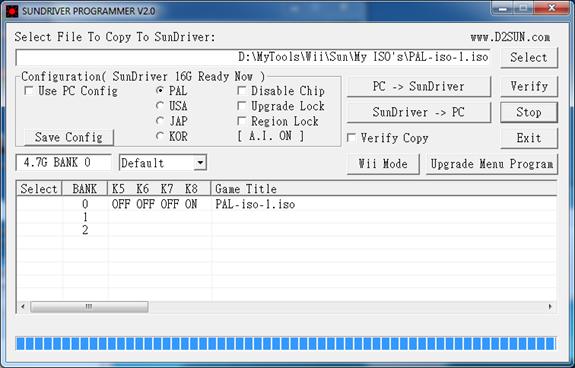
Click the Select button and
browse to your favorite game iso on your PC.

![]()
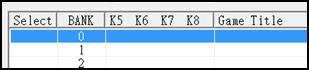
Now select the bank to install
the game into, just click with your mouse on the desired row of the bank, when
selected it will be tagged blue.
Now hit the button PC->SunDriver
![]()
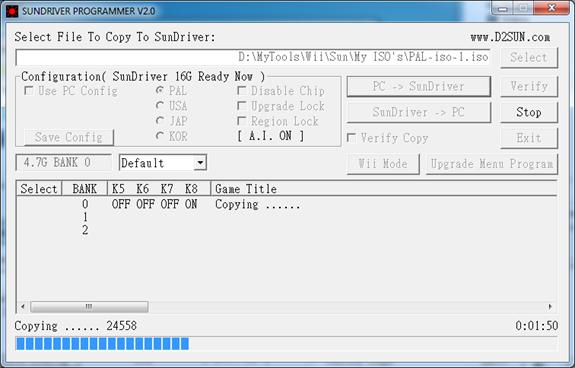
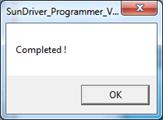
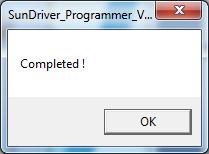
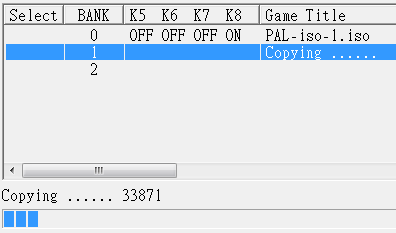
The installation of the game
iso to the SunDriver starts, when done it will popup you the Completed notice.
Select the next game to install by repeating the Select procedure and do
not forget to select a new/available bank to install it to.


Now disconnect the SunDriver USB cable, the SunDisk Menu will re-read
and display the contents of the storage media.
3.9
Operating the SunDriver Game Selection Menu
You can operate the SunDriver Menu by using an GameCube controller, or
by simple use the Wii's RESET and EJECT buttons.
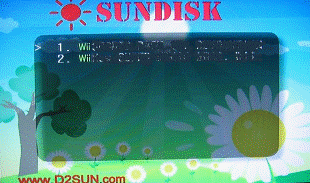

Press RESET will move the cursor to the next entry, press quickly twice
to go to the next page to display. To start the selected game press EJECT, now
the Wii will reboot and the selected game will be mounted in the Wii's Disc
channel.
To return to the SunDriver Menu, stop the game / shutdown the Wii, then
start the Wii by pressing EJECT.
You can also start the wii by pressing POWER and then pres EJECT to
remount the SunDriver Menu again.
4.
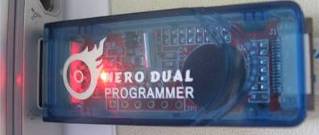
Updating the SunDriver firmware
As advertised the SunDriver is fully upgradable by using the Nero Dual
Programmer.
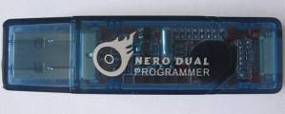
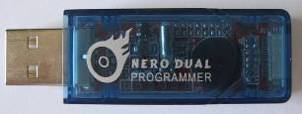
This device is the
programmer used for all D2Sun’s updatable chips.
Updating with this
device is easy and there is no need for drivers at all!
Properly the
hardest part of the update processes it to make sure you have the ribbons
connected correctly.
4.1
Check for the latest SunDriver firmware
Check on the D2Sun’s website
for available SunDriver firmware updates.
http://www.d2sun.com/download.htm
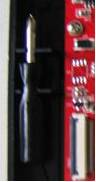
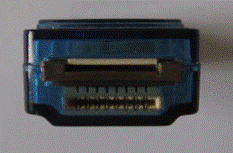
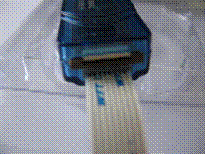
4.2
Connecting SunDriver to the Nero Programmer
Make sure the Nero programmer is connected to the SunDriver by the 8 pin
FPC ribbon, and connect them like show, use the second port on the programmer,
make sure the blue tag of the FPC are at the under-side.
4.3
Connecting Nero Programmer to PC
Connect the Nero Programmer to your PC usb2.0 port, the red led will
light.
4.4
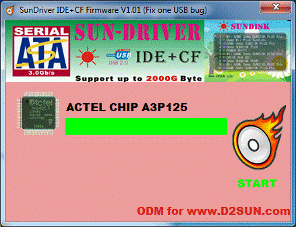
Updating the SunDriver firmware
Start the SunDriver firmware updater, as soon as it finds the Programmer
to be ready, the START button will become green. The update will start and show
you the progress.
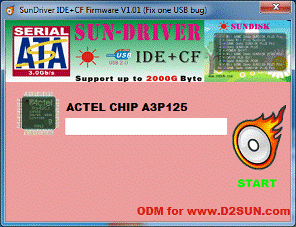
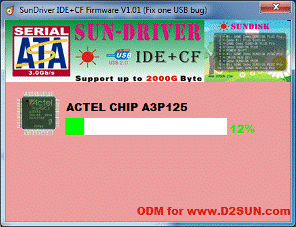
When the update process is finished the start button will become green
and available again.
5.
SunDriver F.A.Q.
Q: Where to find user support for my SunDriver?
A: You can search support on the Official SunDriver Forum @ Wiinews.